
How to Create your Client ID & Secret Key for Xero link with Syrve & configuration requirements.
Step 1: Access the Xero Developer Portal
-
Open your browser and go to:
https://developer.xero.com/app/ -
Sign in using your Xero account.
-
In the top-right corner, click "New App".

Step 2: Create a New App
On the “Add a New App” screen:
-
App Name:
Syrve UK -
Integration Type:
Web App -
Company/Application URL:
https://[your-syrve-address].syrve.app/ -
Redirect URI (Callback URL):
https://exchange.syrve.app/api/exchange/oauth2/auth - Check the box to accept Xero’s Terms & Conditions
- Click "Create App"

Step 3: Configure Your App
-
Once the app is created, go to the Configuration tab.
-
Copy your Client ID.
-
Click “Generate a Secret” and copy the value.

Step 4: Connect to Syrve
-
Open Syrve and go to:
Data Exchange → Configuration → Xero -
Paste the Client ID and Client Secret into the provided fields.
-
Enable the integration and log in with your Xero credentials.

Step 5: Final Setup
-
Map your Chart of Accounts and assign Payment Types to each location from within Syrve.
Directions below for setup;
1. Use this tab to select organizations preconfigured in Xero you wish to set up and link to your Syrve stores and specify their basic business parameters.
1. Global Configurations
Organization
Specify your Xero organization here. If you have more than one organization in Xero, you need to add a separate configuration (integration) for each one of them.
Service Charge Product Category
Specify accounting categories assigned to your sales mix in Syrve you wish to use for service charges in Xero.
Cancellation of Payments
No actions required here.
Voiding of Invoices
No actions required here.
2. Invoices
Contacts
Create a new contact in Xero and add this contact in this field. For instance, Syrve Revenue. Specify your Xero contacts.
3.Payments
a) No actions required here.
Click Save to save the settings and proceed to the next tab.
b) Service Charge
Use this tab to map Syrve services to your Xero accounts. Your time-based services, like Pool, or delivery fees will be charged to the specified Xero accounts.
For a service to appear on this list, it needs to be created in Syrve and have the Service stocklist type.
Check the services you want to track in Xero and specify the Xero accounts you want such services to be charged to. For instance, your Pool Table can be mapped to Other Revenue, but it wholly depends on the way your Xero accounts are set up.
Click Save to save the settings and proceed to the next tab.
c) Payment Types
Use this tab to select Syrve payment types and then map them to specific payment accounts in Xero. You can choose to map all payment types to a single payment account. To add more payment types, click Add.

Select only those accounts that have payments enabled in Xero. If you haven't set up any payment accounts in Xero, they will not be available on this tab. You can create them in the Xero Chart of Accounts.
To account sales, Syrve will send each individual payment to the account you specify. You can also choose to post these payments to a clearing account (or Payment Control Account). If you choose this option, you'll need to create a clearing account in Xero and ensure that payments to that clearing account are enabled in the Chart of Accounts in Xero.
Click Save to save the settings and proceed to the next tab.
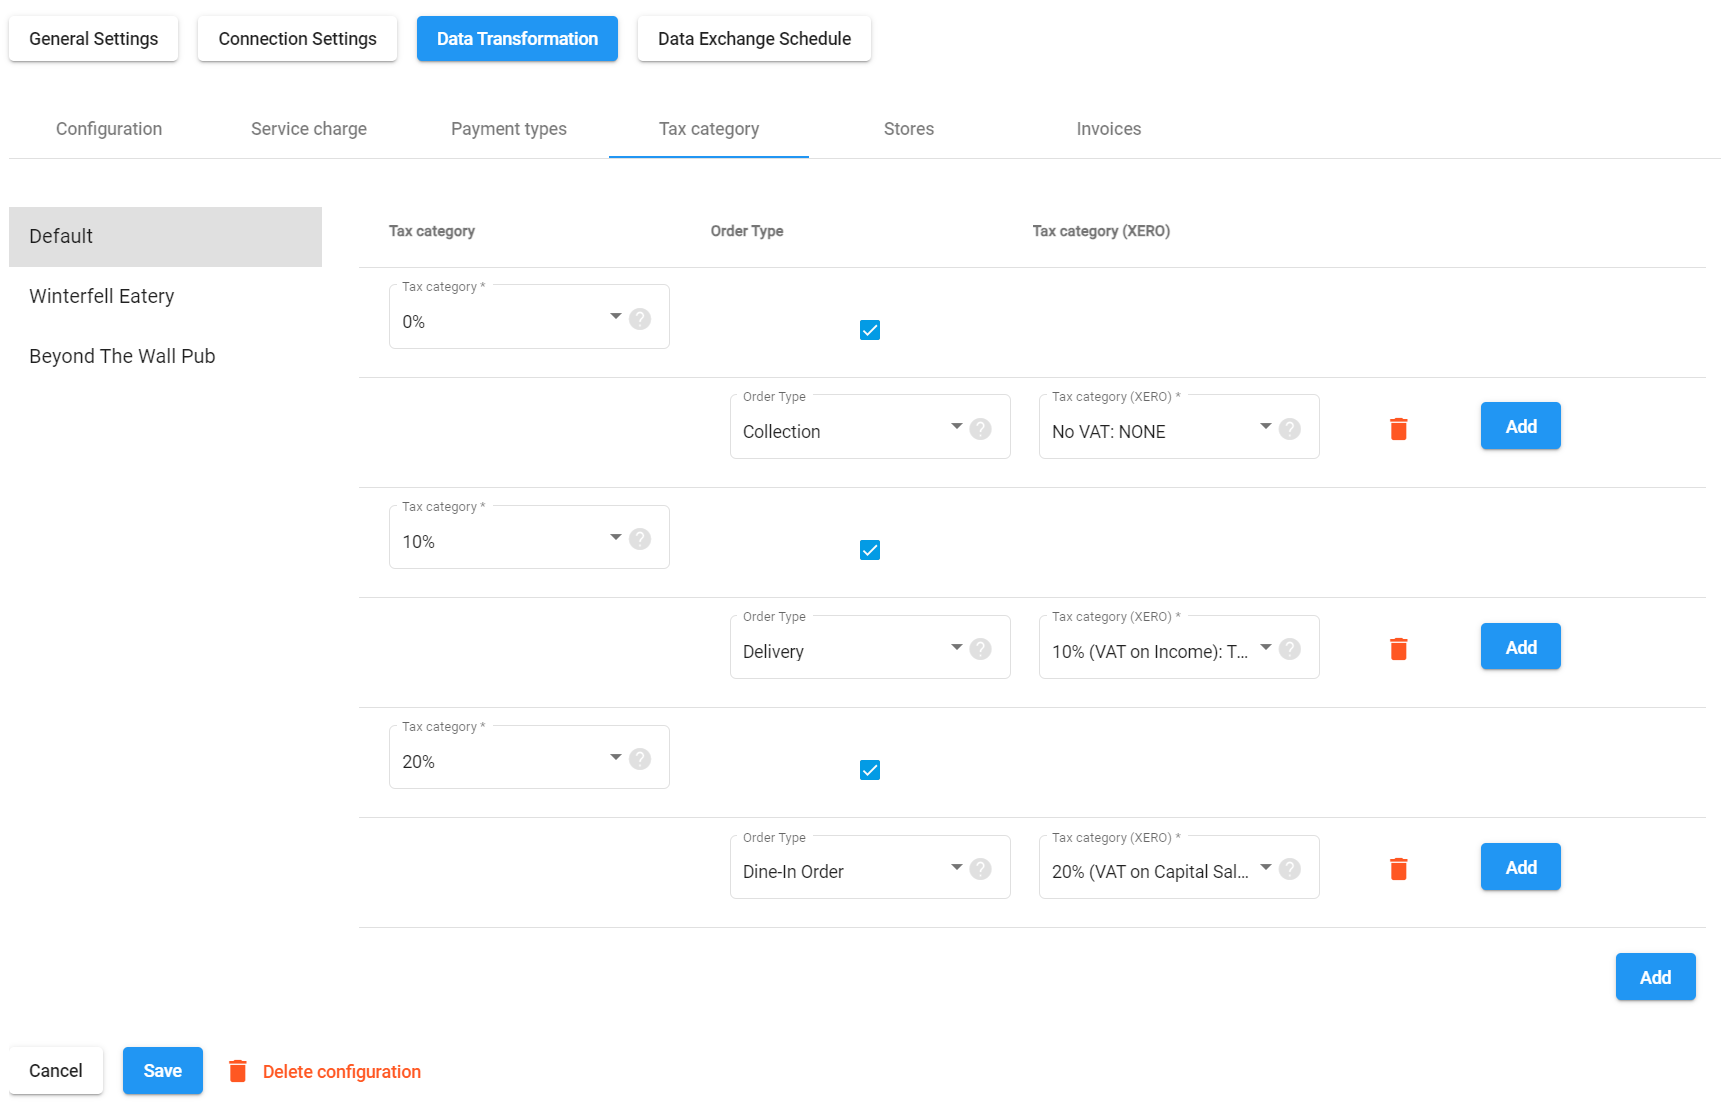
d) Tax Categories
Use this tab to select Syrve tax categories and map them to the relevant tax categories in Xero. Please note the drop-down list you see when mapping Xero categories comes from your Xero account, so you may need to add or change tax rates in your Xero account if you don't have the option you need.
To add more than one category, click Add.
When mapping tax categories you can select which order type (dine-in, delivery, or collection) falls into each tax category. To do this, enable the Order Types option opposite the category in question. To add more than one type, click Add.
Click Save to save the settings and proceed to the next tab.
4. Stores
Use this tab to map your stores to Xero tracking categories. Tracking categories need to be created in Xero in advance and options added. Tracking categories and their options are used to see how different areas of your business are performing (such as departments, cost centers, or locations). This way, your reports help you make proactive business decisions. A tracking category may correspond to a restaurant location or branch and a tracking option may represent a specific point of sales or department.
Select the option from the drop-down list and click Save to proceed.
5. Accounts
Use this tab to map your product sales totals and account sales to a specific account in Xero. If you don't want all sales going to the same account, you can assign an account for each product category on this page.
To do this, select a Syrve product category in the left-hand side drop-down list and then select a Xero account in the right-hand side drop-down list. Click Add to add more categories.
Click Save to save the settings and proceed to the next step.
Step 6 : Integration Complete - Exporting
Proceed to the Data Exchange Schedule section to set up when Syrve will export data to Xero or run the export manually. Once the settings are made, click Save.
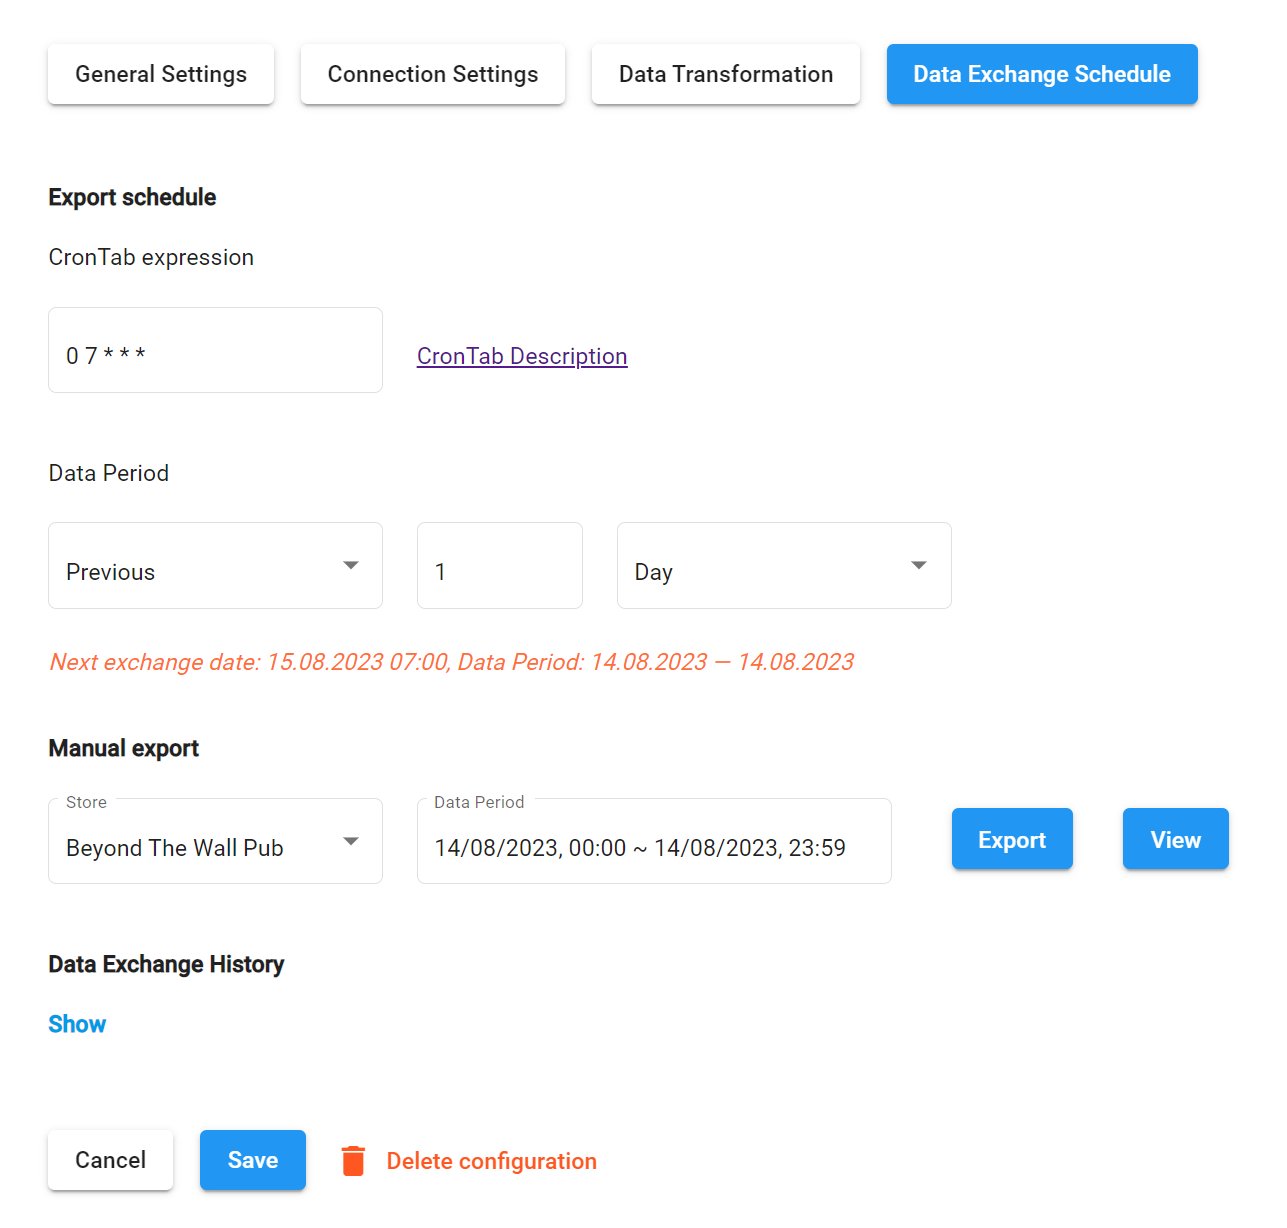
Export Schedule
CronTab Expression
Use this field to set up the exchange time and schedule.
The Cron syntax is used in this field, where each number (or omission of it) stands for a time unit. Omitted units are replaced with asterisks.
The first unit represents minutes (allowed values are 0-59), the second — hours (allowed values are 0-23), third — day (month) (allowed values are 1-31), fourth — months (allowed values are 1-12 or JAN-DEC), and fifth — day (week) (allowed values are 0-6 or 7 or MON-SUN).
For instance, 0 7 * * * means the data exchange will take place at 7:00AM every day; 0 1 7 * * * — the data exchange will take place at 17:00PM every day; 0 8 * * 1 — once a week on Monday at 8:00AM, etc. For more details and examples, please refer to the CronTab Guide.
Data Period
Use this set of fields to specify the period — days, hours, or minutes — as of which the operations in question took place.
Manual Export
Use the Manual Export set of fields to run the export manually.
Click Export, to run the export. Click View to view the data you are about to export.
Once exported, all the operations will be available in your Xero account under the Invoices section found in the Business menu item.
All the transactions (invoices) are broken down by the tax rate and accounting category.
Data Exchange History
Click Show to see the history of your exports.
Troubleshooting Xero :
-
Xero–Syrve Integration Troubleshooting.
Step 1: Access the Xero Developer Portal
-
Can’t log in – Check Xero credentials
-
Try incognito mode or clear browser cache
-
"New App" button not visible – Confirm developer permissions
Step 2: Create a New App
-
URLs must be exact – Replace
[your-syrve-address]correctly -
Redirect URI must match exactly – no trailing slash mismatch
-
App creation fails – Try another browser or refresh
Step 3: Configure Your App
-
Copy Client ID & Secret carefully – avoid extra spaces
-
Can’t generate secret – Refresh the page or log out and back in
Step 4: Connect to Syrve
-
"Invalid client credentials" – Double-check values
-
Xero login fails – Disable popup blockers or browser extensions
-
Can’t enable integration – Ensure fields are correctly filled
Step 5: Final Setup
1. Global Configurations
-
No organization listed – Reconnect the app to Xero
-
Missing service charge categories – Ensure they are configured in Syrve
2. Invoices
-
Contact not found – Create the contact in Xero first (e.g., "Syrve Revenue")
3. Payments
-
Services missing – Must be of
Servicestocklist type in Syrve -
No payment accounts – Ensure accounts have “Enable payments” turned on in Xero
4. Stores
-
No tracking categories – Create in Xero before mapping
5. Accounts
-
Product categories missing – Ensure categories exist and are assigned in Syrve
Step 6: Exporting & Data Exchange
Export Schedule
-
Cron expression incorrect – Validate using https://crontab.guru
Manual Export
-
Manual export not working – Try another browser or check developer console
-
Missing data in Xero – Ensure correct date range and transaction activity
Data Exchange History
-
No logs shown – Integration may not be enabled or exports haven't run
General Tips
-
Restart the process if necessary – begin again from Step 1
-
Confirm correct permissions in both Syrve and Xero
-
Use a modern browser like Chrome or Edge
-
Check Xero API limits if handling large datasets
-
Save error messages and reach out to Syrve or Xero support if stuck
-